[nk_awb awb_type=”color” awb_color=”rgba(255,255,255,0.98)”]
1 How to set the ISO Manually.
If you do not have DX coded film (ie you roll your own film):
a)Slide the power switch forward to the [on] position.
b)Turn the Mode dial (notched wheel on the left of the camera) so that the mode is set to ISO
c) While pressing the mode set button the ISO value appears at the top right hand of the LCD screen. Now by turning the [TV] dial (a notched wheel located above the shutter release button) set the camera to the desired ISO.
2 How to set the function to Manual mode:
a) Turn the Mode dial so that the mode set dial points to [Mode].
b) While pressing the mode set button, turn the [TV] direct dial (a notched wheel located above the shutter release button) until [Hy M] appears on the LCD Screen. If the [Hy M] does not appear on the LCD screen, chances are you have set the main switch to [USER] rather than to [ON] position.
c) Your camera is now set to the Hyper Manual Mode, i.e. you can set the shutter speed and the aperture opening to whatever value you desire. The Aperture opening value appears besides letters [Av] and the exposure time (Time Value) appears beside letters [Tv].
3 How to change the aperture Manually:
a)Set the camera mode to Manual [Hy M] (see step 2)
b)By rotating the aperture ring on the lens (the ring with numbers such as 4, 5.6, 8, 11 etc) the f-number will appear on the bottom right hand side of your LCD screen. Please note that at times especially when you are using long zoom lenses, due to the lens extension the f-number engraved on the ring may not match the f-number that is displayed on the LCD screen or the viewfinder. The LCD dial always indicates the correct f-stop.
4 How to change the Exposure Time (shutter speed) Manually:
5 How to set the exposure function to SPOT:
a) Slide the main switch forward to the [ON] position.
b) Set the camera to Manual [Hy M] (see step 2)
c) Press and hold down the spot button on the back of the camera (a small dot in the middle of a rectangle) while rotating the [Tv] dial (a notched wheel located above the shutter release button) when the spotmetering symbol appears at the bottom right hand side of the external LCD screen, your camera’s meter is set to [SPOT]
6 How to find the normal exposure of a simple subject:
a) Set the exposure mode to Manual [Hy M] by following the directions in step 2.
b) Choose a starting shutter speed (exposure time) if you are not sure of your shutter speed setting, particularly for outside shots set it to a number close to the ISO of the film being used. For example if your film’s ISO is 100 set it to 1/125 sec. This can be done by following the directions in step 4. Now turn your metering to [SPOT]. This can be done by following the directions in step 5.
c) Point the spotmetering circle located at the center of the viewfinder at the desired simple tone and turn the aperture ring on the lens to find its normal exposure. This is when the pointer on the vertical scale of your viewfinder is positioned exactly in the middle of [+] and [-] signs. Put a roll of 100 ISO slide film in your Pentax PZ-1P (pz1p) camera and choose an outdoor subject. Activate the spotmetering option on your camera and set your camera’s mode to manual and to the shutter sped to 1/125 sec. To avoid confusion, in this book we will increase and decrease the exposure by opening-up and closing-down the aperture. The shutter speed will remain fixed.
- Observe your subject and break it down into its simple subject (single tone) components. Choose a Reference Tone. A Reference Tone is usually chosen from the most important part of the subject. Once you have selected the Reference Tone, point your spotmeter at this tone and find its normal exposure. If your subject does not have a distinct single tone and you are using slide film, pick out a tone that is medium gray or brighter. If you are using a negative film, pick out a tone that is medium gray or darker.
- Let’s assume the “normal exposure” indicated by your camera for this Reference Tone is 125@f-8 (i.e., 1/125 sec. at an aperture setting of 8).
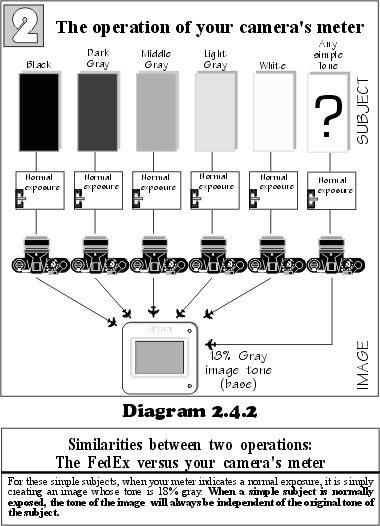
- As you may know know, the spotmeter’s “normal exposure” from any simple (single toned) surface will always provide the photographer with an 18% gray image tone.
- The image tone that your normal exposure provides is independent of the original tone of your subject.
- In spotmetering, converting the “normal exposure” to the “correct exposure” is what a photographer must do. In other words, the “normal exposure” readings of the spotmeter must be interpreted by the photographer to determine the subject’s”correct exposure.” The principle behind this simplified technique is that if one tone of a complex subject is exposed correctly, the rest of the tones follow and will also be correctly exposed . Now decide which one of the following tones would most closely matches your Reference Tone: Black, Dark Gray, Medium Gray, Light Gray or White. With this simplified technique you must choose one of these five tones. Once you have decided which one of these five tones best matches your Reference Tone, then adjust your camera settings accordingly:
- If you chose Black, you need to decrease the “normal exposure” setting by two stops. Closing- down the aperture by two stops converts the 18% gray image tone to Black. The correct exposure is now 125@f-16.
- If you chose Dark Gray, you need to decrease the “normal exposure” setting by one stop. Closing- down the aperture by one stop converts the 18% gray image tone to Dark gray. The correct exposure is now of 125@f-11.
- If you chose Medium Gray, leave the aperture and shutter speed as they are since the meter is already creating an 18% gray (Medium Gray) image tone, i.e., the tone of the image matches the approximate tone of the Reference Tone. Also remember that when metering from a medium gray surface, the “normal exposure” and “correct exposure” settings are approximately the same.
- If you chose Light Gray, you need to increase the “normal exposure” setting by one stop. Opening-up the aperture by one stop converts the 18% gray image tone to Light Gray. This results in a correct exposure of 125@f-5.6.
- If you chose White, you need to increase the “normal exposure” setting by two stops. Opening-up the aperture by two stops converts the 18% gray image tone to White. The correct exposure is now 125@f-4. [/nk_awb]
